Introduction
In this tutorial, we delve into the intricacies of designing a solar pump system, a sustainable solution harnessing solar energy for water pumping. Ideal for remote or off-grid locations, these systems are increasingly pivotal in modern agriculture, livestock management, and rural water supply.
Overview
A solar pump system utilizes photovoltaic panels to power a water pump, eliminating the need for conventional electricity or diesel. Its applications span from irrigation to potable water supply in areas lacking grid connectivity.
Benefits
The primary advantage of solar pump systems lies in their renewable energy source, reducing operational costs and carbon footprint. They are particularly beneficial in remote areas, offering a reliable and eco-friendly water pumping solution.
Step 1: Assessing Water Requirements
- Determine Flow Rate and Total Dynamic Head (TDH): Calculate the necessary water flow rate, expressed in liters per second or gallons per minute. TDH encompasses vertical lift, horizontal distance, and friction losses within the system.
For example : Pump type: Submersible pump ,Flow rate : 6 m³/ ,Vertical head: 60 meters Horizontal distance: 100 meters
Requirements analysis:
Flow rate requirement: 6 m³/h
Vertical head: 63.3 meters (horizontal distance of 100 meters = vertical head 3.3meter )
System operation time per day: 6 hours (assuming a sunny day)
Step 2: Selecting the Pump
- Type of Pump: Choose between submersible pumps for wells or surface pumps for water sources like rivers or lakes.
- Pump Specifications: Ensure the pump’s flow rate and head capacity meet your calculated requirements.

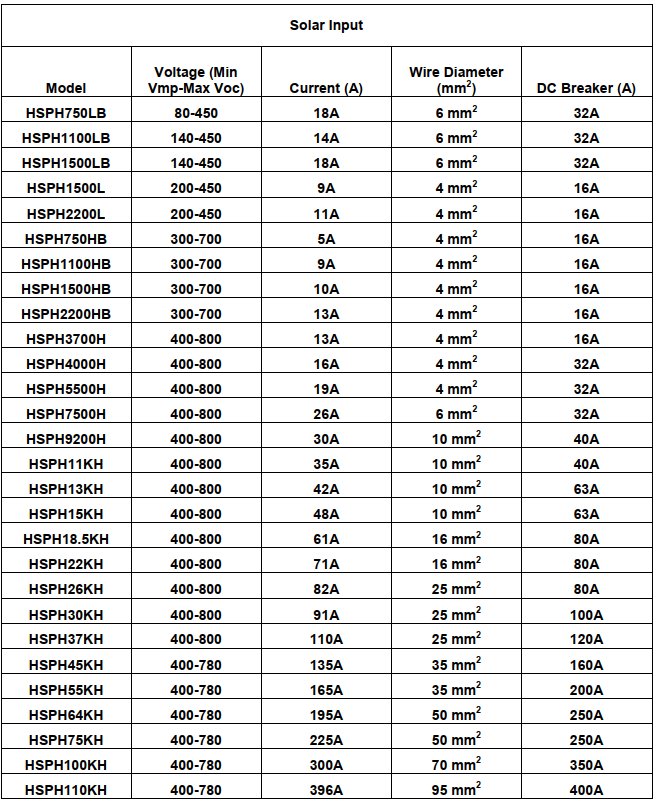
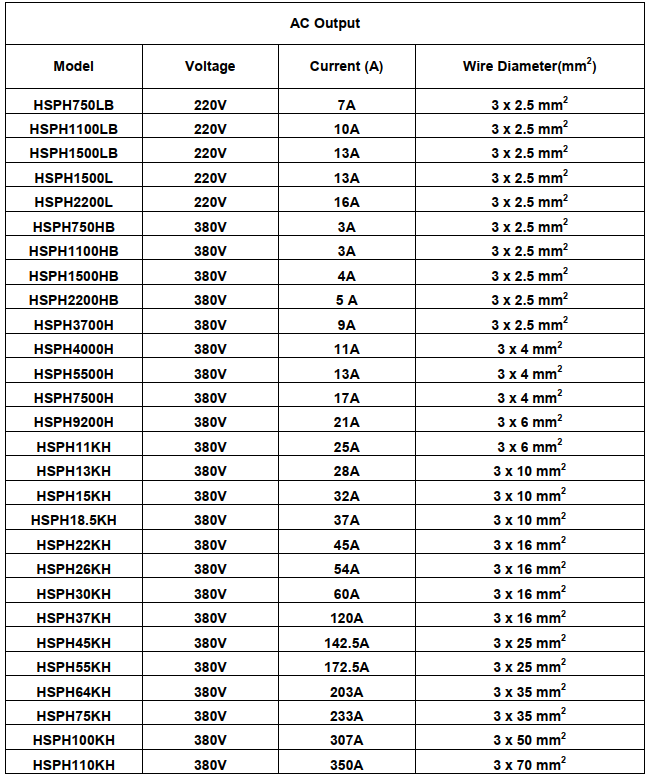
Pump : The 2.2 kW pump 220V or 380V. Its maximum head is 127 meters.
The flow rate is 6 m³/h @83meters, which meets the requirement.
Note:
As the 380V pump & inverter required higher voltage input, which may result in power wastage when connected to solar panels, we suggest to choose a 220V pump instead.
For a single-phase 220V pump, the external capacitor is necessary (as the inverter already performs the phase shifting internally), while the starting/running capacitor should be removed.
Step 3: Choosing the Right Inverter
- Inverter Type: Opt for an inverter with MPPT (Maximum Power Point Tracking) for enhanced efficiency.
- Size and Specifications: The inverter should match the pump’s power requirements and solar panel output.
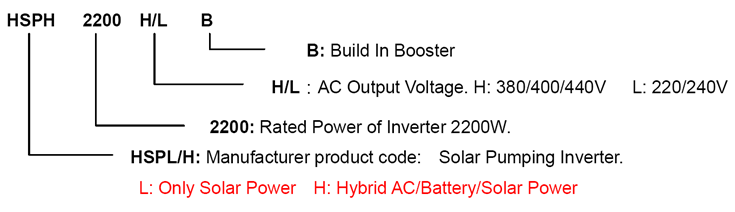
Based on the known specifications of the pump (2.2 kW, 220V, 1 phase), the recommend inverter model is HSPH2200L & the recommend MPPT DC Input Voltage Range as below:
300Vmp<DC Input<450Voc (Only Solar)
340Vmp<DC Input<400Voc (Hybrid Power)
Note: The maximum input voltage and working voltage of the inverter will determine the connection method of the solar panels.
Step 4: Solar Panel Calculation
- Solar Panel Power: The total power required by the pump should be multiplied by 1.5 to compensate for inefficiencies and sunlight variability.
- Number of Panels: Calculate the number of panels needed based on individual panel wattage.

Solar Panel Power
The total power of the solar panels should be 1.5 times the power of the water pump, which is 2.2 kW * 1.5 = 3.3 kW. 3.3 kW / 0.405 kW = 8.148 panels.
Solar Panel Connection
The maximum input circuit voltage of the inverter is 450Voc. If we consider the recommended working voltage of 300Vmp, we can calculate the number of panels that can be connected in series.
450Voc/37.58Voc = 11.97 panels(Max)
300Vmp/31.47Vmp = 9.53 panels(Min)
Note
Setting the solar panel power to 1.5 times the power of the water pump is a theoretical value. It can be adjusted based on local sunlight conditions. If sunlight conditions are good, you can reduce the number of solar panels. Conversely you may need to increase the number of solar panels to ensure an adequate energy supply.
Step 5: System Configuration
- Panel Arrangement: Decide on a series or parallel configuration based on the inverter’s voltage and current specifications.
- Mounting and Orientation: Plan for optimal sunlight exposure in mounting and orienting the panels.
- How the system running with 11pcs solar panel connected in series?
Connecting 11 panels instead of the minimum required 8 panels will have an impact on the system’s operation. The total water supply per day can be calculated based on 7 hours of operation. With more solar panels installed, the rated water output time will be higher. Conversely, if fewer panels are connected, the total water supply will be reduced. Therefore, the number of solar panels connected directly affects the overall water supply capacity of the system. - How the system running with 6pcs solar panel connected in series?
6 * 31.47 = 188.82. Due to the minimum input voltage requirement of the inverter being 200 volts or above, connecting only 6 panels may potentially trigger the inverter’s low voltage protection - How the system running with 7pcs solar panel connected in series?
Using 7 panels will not trigger the inverter’s low voltage protection (7 * 31.47V = 220.29V). The system can still operate, but the water pump’s output will be reduced, and it may not reach the rated flow rate.
so the system configuration :
Water flow:6m³/h ,vertical lift height :60m,
Horizontal distance 100 meters.
Solution:
Pump: 2.2KW 220V 1phase (External capacitor)
Inverter:HSPH2200L
Solar panels:9pcs of 405W in series
Rated flow:6m³/h*6 = 36m³ @ 80 head (Sunny day)
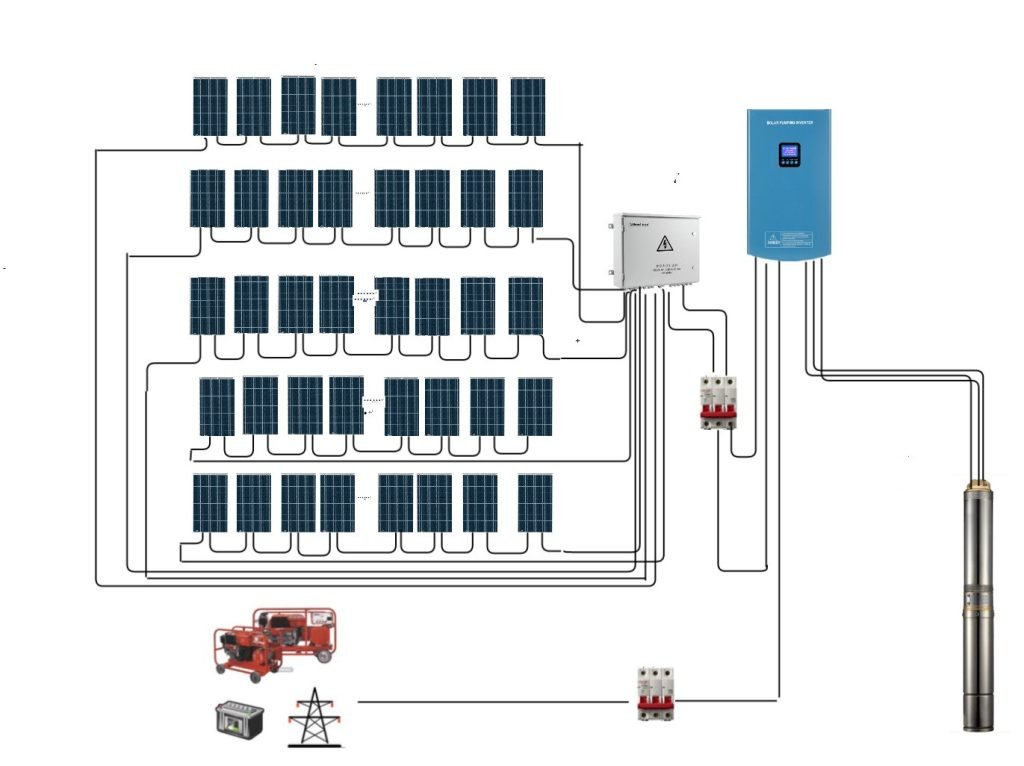
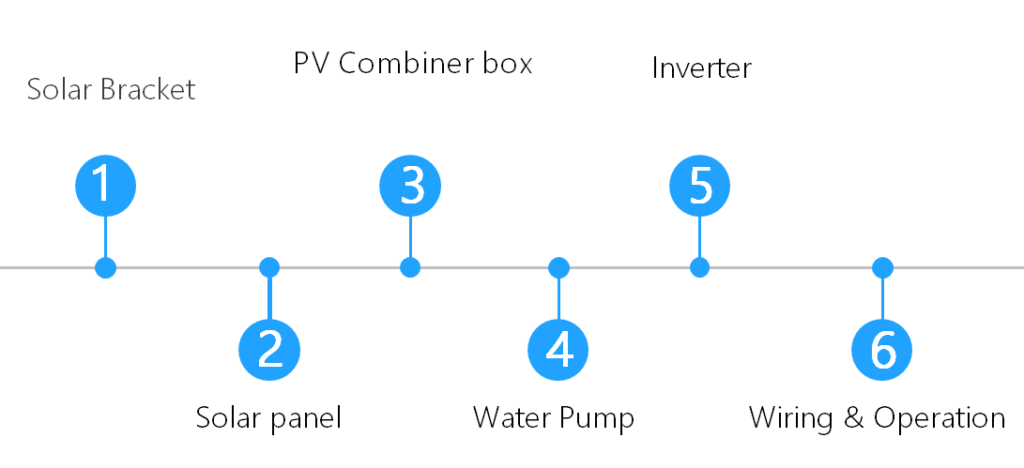
Step 6: Electrical Connections for Solar Pump System Design
1. Planning the Electrical Layout
Determine Component Placement: Identify the positions of the solar panels, combiner box, inverter, and water pump.
Calculate Cable Lengths: Measure and calculate the required lengths of cables to connect all components efficiently.
2. Selecting Cables
DC Cables: Use appropriate gauge cables for connecting solar panels to the combiner box and from the combiner box to the inverter.
AC Cables: Use suitable cables for connecting the inverter to the water pump.
Grounding: Ensure proper grounding cables are included to protect the system from electrical faults.
3. Installing the Combiner Box
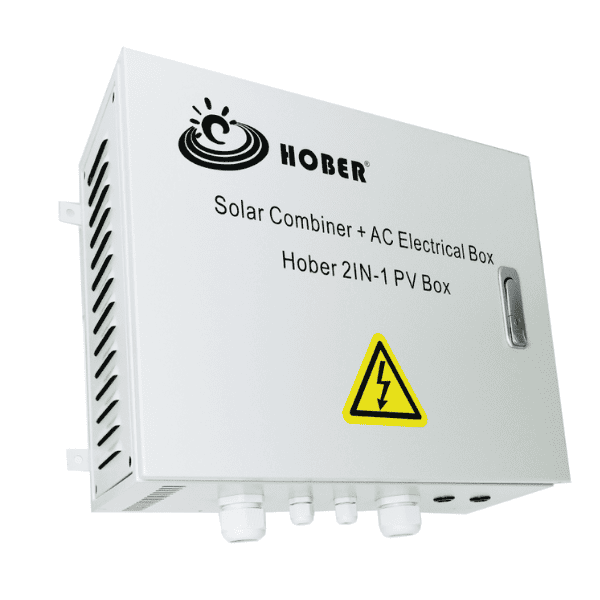
Mounting: Securely mount the PV combiner box close to the solar panels.
Connections: Connect the positive and negative terminals of the solar panels to the corresponding inputs in the combiner box.
Safety Devices: Ensure fuses and surge protection devices are installed within the combiner box.
4. Connecting the Inverter
DC Input: Connect the output from the combiner box to the DC input terminals of the inverter.
AC Output: Connect the AC output terminals of the inverter to the water pump.
AC input (hybrid function ): Connect the AC input terminals of the inverter to the water pump.

5. Grounding
Ground Rod Installation: Install ground rods near the inverter and combiner box.
Grounding Connections: Connect all metal parts of the system to the ground rods using grounding cables.
6. Final Checks and Testing
Inspect Connections: Ensure all connections are tight and secure.
Polarity Check: Verify the correct polarity for all DC connections to prevent damage to the components.
System Testing: Power on the system and check for proper operation. Monitor the voltage and current to ensure they are within acceptable ranges.
7. Documentation and Safety
Labeling: Label all cables and components for easy identification.
Safety Precautions: Follow all safety protocols and ensure the system is installed in compliance with local electrical codes and standards.
8. Selection of Reactors
Determine the Need for Reactors: Reactors can help manage voltage spikes, reduce harmonics, and improve the overall power quality. It is strongly recommended to use reactors when the pump cable length exceeds 100 meters.

Types of Reactors:
- DC Reactors: Placed on the DC side to smooth the DC current.
- AC Reactors: Placed on the AC side to filter out harmonics and improve power quality.
Recommendations:
- When to Use Reactors: It is strongly recommended to use reactors when the pump cable length exceeds 100 meters.
- Benefits: Using reactors helps to:
- Protect the inverter and pump from voltage spikes.
- Reduce electrical noise and harmonics.
- Improve the efficiency and longevity of the system.
Selecting Appropriate Reactors:
- Current Rating: Ensure the reactor can handle the current levels of the system.
- Inductance Value: Choose a reactor with an inductance value that matches the system requirements.
- Installation: Install the reactor between the inverter and the water pump, or as specified by the system design.
Step 7: Selection of Pipes and Valves for Solar Pump System
Proper selection of pipes and valves is crucial for ensuring the efficiency and longevity of a solar pump system. Here are the key considerations:
1. Determining Pipe Material
PVC (Polyvinyl Chloride):
- Advantages: Lightweight, corrosion-resistant, easy to install.
- Applications: Suitable for most solar pump systems, particularly for small to medium-sized installations.
HDPE (High-Density Polyethylene):
- Advantages: Flexible, durable, and resistant to impact and chemicals.
- Applications: Ideal for larger systems and installations in harsh environments.
Galvanized Steel:
- Advantages: Strong and durable.
- Applications: Used in high-pressure systems or where the pipes are exposed to mechanical damage.
2. Pipe Diameter
Calculate Flow Rate Requirements:
- Determine the required flow rate for your system based on the pump’s capacity and the needs of the application.
Selecting the Right Diameter:
- Larger diameter pipes reduce friction losses and improve efficiency but can be more expensive.
- Use flow rate charts and friction loss tables to select the appropriate pipe diameter for your specific requirements.
3. Pipe Length
Measure the Distance:
- Measure the total distance from the water source to the point of use.
Minimize Bends and Fittings:
- Reducing the number of bends and fittings minimizes pressure losses and improves system efficiency.
4. Pressure Rating
Match the Pipe Pressure Rating:
- Ensure the pipes can handle the maximum pressure produced by the pump.
Consider Pressure Losses:
- Account for pressure losses due to friction and elevation changes in the pipe selection process.
5. Installation Considerations
Secure and Support Pipes:
- Properly secure and support the pipes to prevent sagging and damage.
Allow for Thermal Expansion:
- Consider thermal expansion, especially for plastic pipes, to avoid damage due to temperature changes.
Avoid Airlocks:
- Ensure proper slope and venting to prevent airlocks in the system.
6. Selection of Valves
Type of Valves:
- Gate Valves: Used for on/off control with minimal pressure drop.
- Ball Valves: Provide reliable sealing and are easy to operate.
- Check Valves: Prevent backflow and ensure unidirectional flow.
Material of Valves:
- PVC: Corrosion-resistant and suitable for low-pressure applications.
- Brass: Durable and suitable for a wide range of applications.
- Stainless Steel: High strength and corrosion resistance for high-pressure systems.
Valve Sizing:
- Match the valve size to the pipe diameter to ensure efficient flow control and minimal pressure loss.
7. Maintenance and Accessibility
Easy Access for Maintenance:
- Design the system so that pipes and valves are accessible for inspection and maintenance.
Durability and Lifespan:
- Choose materials and installation methods that maximize the lifespan and durability of the pipes and valves.
Step 8: System Installation
Practical Considerations for Solar Pump System Installation
When installing a solar pump system, keep the following key points in mind to ensure a successful and efficient setup:
Safety Precautions
- Qualified Personnel: Only qualified technicians should perform the installation.
- Power Off: Ensure all electrical installations are carried out with the power off.
- Protective Gear: Wear gloves, goggles, and safety boots.
Site Selection and Preparation
- Avoid Shadows: Install solar panels in locations free from shadows.
- Sturdy Foundation: Ensure the mounting structure is secure and can withstand strong winds.
- Proper Spacing: Maintain adequate spacing between solar panels.
Solar Panel Installation
- Use Corrosion-Resistant Materials: Choose steel or aluminum alloy for solar brackets.
- Foundation Settlement: Consider foundation settlement, especially in soft or sandy soils.
- Minimize Wire Length: Place solar panels close to the inverter.
- Consistent Parameters: Use solar panels with matching specifications.
- Ventilation for Combiner Box: Install in a ventilated area, away from direct sunlight.
Electrical Connections
- Check Polarity: Ensure correct polarity for all DC connections.
- Proper Cable Sizing: Use cables that can handle the current load and minimize voltage drop.
- Secure Connections: Tighten all electrical connections to prevent arcing.
Inverter Installation
- Good Ventilation: Install the inverter in a ventilated area, away from direct sunlight.
- Side-by-Side Installation: Place multiple inverters side by side, not stacked.
Pump Installation
- Correct Depth: Install pumps at least 1 meter below the dynamic water level and 5 meters above the well bottom.
- Secure Mounting: Use wire rope and clamps to secure the pump.
- Proper Pipe Selection: Use PVC pipes for heads within 100 meters and rust-treated steel pipes for deeper installations.
Reactor Usage
- Long Cables: Use reactors for pump cables longer than 100 meters to manage voltage spikes and reduce harmonics. Thicken the output cable.
Grounding and Lightning Protection
- Reliable Grounding: Ground all components properly.
- Lightning Arresters: Install as specified to protect from lightning strikes
Step 9: Testing and Commissioning
- System Testing: Describe procedures to ensure the system operates correctly.
- Troubleshooting Tips: Offer solutions for common system issues.
Step 10: Maintenance and Monitoring(how to maintenance solar pump system )
- Regular Maintenance: Establish a maintenance schedule for the pump, panels, and inverter.
- Monitoring System Performance: Discuss methods to monitor and ensure long-term system efficiency.

Step 11 :Solar Pump System Troubleshooting
1. Check Power Supply
First, ensure that the solar panels or battery pack are functioning properly. Common power supply issues include:
- Solar Panel Obstructions: Check for dust, leaves, or other debris covering the solar panels, which can affect light absorption.
- Connection Issues: Inspect the connections between the solar panels and the battery pack to ensure they are secure and free from corrosion.
- Voltage Check: Use a multimeter to measure the voltage output from the solar panels and battery pack, ensuring it is within the normal range.
2. Check the Inverter
The inverter is a crucial component that converts the DC power from the solar panels to AC power for the pump. Problems with the inverter can affect the entire system:
- Error Codes: Check for any error codes or fault indications on the inverter’s display panel.
- Connections: Ensure that all electrical connections to and from the inverter are secure and free of corrosion.
- Overheating: Check if the inverter is overheating, which can be a sign of a malfunction or inadequate ventilation.
3. Check the Pump and Pipeline System
The pump and pipeline are the core components of the solar pump system, and their condition directly impacts efficiency:
- Pump Motor: Listen for unusual noises or vibrations from the pump motor, as overheating or abnormal sounds can indicate problems.
- Pump Impeller: Ensure the pump impeller is not jammed with debris or damaged.
- Pipeline Leaks: Inspect the pipeline for leaks, which can cause insufficient water pressure and reduce pump performance.
4. Check Sensors and Switches
Sensors and switches monitor and control the system’s operation, and any faults can disrupt the normal functioning:
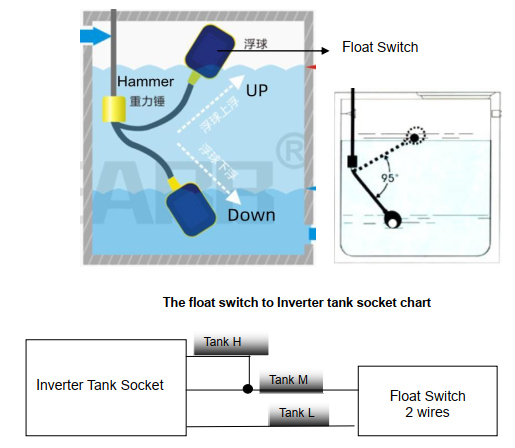
- Float Switch: Check if the float switch is stuck or damaged. This switch detects water levels and controls the pump’s start and stop operations.
- Pressure Sensor: Ensure the pressure sensor is not blocked or damaged. It monitors system pressure and prevents overpressure or low pressure.
5. Environmental Factors
Environmental conditions can also affect the operation of the solar pump system:
- Temperature Impact: Extreme temperatures can impact the efficiency of solar panels and battery performance. Ensure the system operates within the recommended temperature range.
- Weather Conditions: Extended periods of cloudy or rainy weather can lead to insufficient charging of solar panels. Check weather records and forecasts to determine if the power issue is temporary.
6. Consult Professional Technical Support
If the above checks do not resolve the problem, it is advisable to contact professional technical support. Experts can provide in-depth diagnostics and solutions:
- Document Fault Symptoms: Record the fault symptoms and the troubleshooting steps already taken, so the technical support team can better understand the issue.
- Provide System Information: Share details about the system model, installation date, and operating environment to help technicians quickly identify the problem.
Conclusion
We’ve covered the essential steps in designing a solar pump system. For further learning, consult additional resources provided.